Trying to be social

I am terrible at social media.

There, I said it.

In my last post, I said I was planning to switch to Instagram to catalogue my sewing as I felt I wanted to record my progress and I didn’t have time to write regular blog posts. I have been doing this very regularly but every time I go to post a picture I find myself asking myself why I am doing it. Very few people follow me – mostly just companies who followed me to get a follow back to boost people viewing their product – and it is rare that someone likes my posts. I know that the key is to persist. You keep posting, using the relevant hashtags, tagging the relevant people, riding the latest bandwagons, following all the right people until eventually more and more like-minded souls find you in return. But I find it hard to persist when I feel like I am just posting into the void.

I also feel there is a lot more pressure to make my pictures pretty as so many other Instagram accounts are full of stylish and cool photos. I find myself wondering whether spending longer on the lighting or getting the angle right or investing in matching sewing supplies would make my posts more enticing but I’m not sure this is a rabbit hole I want to fall down!

I try to always tag in the designers of the patterns I’m using in the hope that they might share my makes, as they sometimes do, but have had no luck yet. I imagine they must get loads of people sharing things and tagging them and I’m not surprised to have not been singled out among the masses but every now and then I wonder if mine simply don’t get shared because they are not good enough.

This is the central danger of social media. It makes you seek approval you would have otherwise happily lived without and causes you to question why you are ‘unpopular’. It can make you feel invisible as you silently watch others get noticed, going unnoticed yourself.

I want to experiment with a Vlog now that I have more time, but it feels very alien to me, as I feel like I am talking to no one. I wrote a post on not really minding if no one really reads my blog, about finding that writing things and putting them out there was cathartic even if you do not think anyone will read them, but for some reason I do mind if no one reads my Tweets, follows my Instagram or watches my Vlog.

I tried Twitter briefly. I managed the Twitter feed for my department in my last job so it isn’t a new format for me but it was never one that I wanted to use in my personal life. I have some very funny friends with excellent Twitter feeds. They have really mastered the art of this short and to the point format. I am not one of them. I did not want to be one of the millions writing banal tweets that no one wants to read and that no one is reading. I was doing some research on historic costumes and so I joined Twitter and followed lots of exciting costume historians and museums and every time I logged in was a delight. My feed was full of beautiful fabrics and fashions throughout the ages. A few friends found and added me but I wasn’t tweeting. Now that I had a few followers I felt a lot a pressure to Tweet but had nothing to say. Eventually, my research at an end, I found that my feed being full of (still beautiful but) no longer relevant historic costume no longer suited my needs and I gradually stopped checking in at all.

I think perhaps if I was more active on forums, like the (truly excellent) Fold Line, that might lead people I’m chatting with to seek out my Instagram but I don’t yet feel confident offering suggestions or answering other, probably already more experienced, peoples questions. I haven’t felt confident enough to review anything yet either. I’m still at the ‘it might have gone wrong because I did something wrong’ stage when mistakes happen and generally think it is my own ignorance and not the pattern that is at fault. As my post on fear of failure will highlight, I also find it very difficult to ask for help as it means admitting that I do not know something so I haven’t posted any questions of my own.

I also know that I ought to comment on more of the Instagram pictures of people I follow but I feel like a bit of creep commenting on the pictures of people who are effectively strangers to me! It has taken a lot just for me to start liking pictures! I feel like my comments would be an unsolicited intrusion even though I know that the very act of posting something to a social media platform is to invite comment and interaction.

The multi-pronged attack also requires a lot more time. If you are active on forums, writing blogs, composing Vlogs and posting on Instagram – when do you actually find the time to sew?! I am still very slow at sewing and I don’t want talking about sewing to replace actual sewing!

In spite of all the evidence that perhaps all this sharing on the internet malarkey might not be for me, I have decided to attempt a Vlog and you can find post one here:

So far, I have learned from this that when on camera I use my ‘posh phone voice’.

Me Made May

The year so far has been busy.  Though I have found time to sew, I have not found time to blog.  As my last post is evidence of, I even wrote a post that I didn’t get around to putting up!

I’m hoping to rectify my poor showing in the sewing community but mostly via using Instagram. I hope I can find more time to blog but realistically I’m more likely to have the time to share quick snaps on Instagram! I have found the things that other bloggers share immeasurably useful. Tips, pattern reviews, inspiration – it’s all there! I have felt like I have been taking from the community without giving back and stalking strangers without giving them the opportunity to stalk right back!

So as well as a commitment to posting more of my projects, whether that is here or on Instagram, I also wanted to take part in Me Made May this year.

mmmay16final

This is the first year I can take part and, though I haven’t built up enough of a handmade wardrobe to wear my things every day I have made a commitment to wear me made clothes at least 3 times a week. To make this easier, I have two Grainline Studio Scout Tees in the pipeline that I’m hoping to have made by the start of May.

My major project at the moment is my plan to sew four Bridesmaids dresses, 2 groomswomen dresses and 6 ties for my upcoming wedding this Winter so in addition to wearing more of my own clothes in May, I also plan to have made the initial toiles for all four of the bridemaids dresses by the end of May.

Here is my pledge:

I, Elizabeth Back (@BackElizabeth on Instagram), sign up as a participant of Me-Made-May ’16. I endeavour to wear me made clothes at least 3 times a week for the duration of May 2016. I also hope to make the first muslins for 4 bridesmaids dresses in May.

The bridesmaids will be in the gorgeous Kim dress by By Hand London and the Groomswomen will wear sleeveless versions of Megan from Tilly Walnes’ book, Love at First Stitch. I have already made one of the Groomswomen dresses and I can’t wait to get started on the bridesmaids!

The Imperfect Fit

The below post was written in December last year, but I didn’t get around to posting it.  As it turns out, I’m really happy with the dress I made, so there is a silver lining at the end of this!*


When I started writing about sewing, I talked about the hope that sewing might improve my body image.  Others had stated how sewing clothes that fit them well and complimented their shape made them feel more confident in their body and comfortable with thieir shape.

I was recently reminded of this by two things.  The first was coming across a sewing blog that I hadn’t seen before where the author also discussed sewing and body image in a positive light and the second was my own experience of the exact opposite.

Most of the time I am able to ignore my scoliosis. From the front I think I look ok.  I tend to look like I’m leaning on one leg in a slightly sassy, hippy pose, when I’m actually standing still and upright but I’m ok with that. It’s just part of my look. There is a misalignment of my ribcage that would probably be more prominent if I had smaller breasts.  I am not excessively endowed in this department but I have enough to be able to select clothes to skim over the lump created by my ribcage on my left hand side.  From the side I also look ok, I think.  If you took a picture of each side and compared them you would notice they are different, almost like two different people with different back shapes and posture, but each side on its own doesn’t look especially unusual.

There are very few situations in which I see my back.  If I picture it in my mind, I tend to picture a normal, aligned back.  In fact, in my mind it’s a beautiful back; the sort that ought to be shown off in sexy backless dresses.  I don’t ever see it, so why not imagine it is lovely?  I know, of course, that it isn’t.  When trying on wedding dresses at a Bridal shop my Mother would tell me that this or that dress really highlighted my scoliosis. It sounds cruel but it was useful to know. There are going to be a lot of pictures of me from every angle on my wedding day and I don’t want to find out after the fact that some of those angles looked awful. My mother told me it didn’t look good and I believed her and discarded those dresses, but even so, I still don’t actually picture my back as in any way unusual looking.

And then I made my first toile or muslin and had my other half take pictures from all angles so I could assess the fit.

My illusions about how my back looks were shattered.  I was confronted by the reality, by how obvious the misalignment of my spine really was, and I think I was much happier when I didn’t know!

The worst part is that not only did it make me feel incredibly self-conscious about the way that I look but that it felt like it had been something of a waste of time.  Now I had the information (saw the drag lines and pulls and areas of bagginess and all the fitting issues) but I had no idea what to do with that information. I had read that you shouldn’t over fit and that it is best to keep symmetry in the pattern – overfitting each side of your body separately could actually highlight that lack of symmetry in your body and you want to create balance. So what do I do?  One side has drag lines where it stretches over my shoulder blade but the other side has bagginess because there is a dip on that side.  One side of the bodice is too long and the excess fabric pools above my hips but the other side is the correct length because that hip is lower.

Ultimately, I decided to do nothing and made no changes to the back.  If I maintained symmetry in the pattern then fixing a problem on one side would create a problem on the other and I was afraid that creating two separate back pieces might just emphasise all these differences and shapes and might make fitting the zip a further challenge.


* Actually, I ultimately took a chunk out of the top of the shoulder seams on the raglan sleeves and this improved the hang and fit of the whole dress.  I made it up in a Black Watch tartan style cotton and I think the dark fabric also hides a lot.  I wore on both Christmas day and New Years Eve and it is probably one of my most worn projects so far:

Tilly and the Buttons Françoise dress

Tilly and the Buttons Françoise dress

Sewing Therapy

I now have my sewing machine in my room at my new place and have made two new things and am part way through a third. Conditions are a bit cramped when I have to get the ironing board out but I am really pleased that I am at least able to carry on.

Sew Space

Sewing has been so relaxing. Don’t get me wrong, there have been some stressful moments, but I’ve still found it to be a surprisingly useful hobby to have when your life is otherwise busy and stressful. It sounds strange because it takes up so much time (and space!) but it requires a level of focus that means I’m just thinking about the garment and not stressing about all the other little things in life that could otherwise overwhelm me.

I am pretty easily overwhelmed at the moment.  As someone prone to anxiety, moving out of my loving and secure home with my other half and back into a shared house with four other people in a new city while taking on a new, but temporary, job that is hopefully the start of a new career but that will also require further study and many more temporary jobs before I am likely to be at a stable point in this career…well, all of this has been quite a big deal. I am exhausted and sometimes the anxiety can get overwhelming.

I, albeit temporarily, no longer live with my other half, we live in different cities, I’m travelling a lot so that we can still see each other, I’m in a new job, I feel under pressure to accept any opportunity offered in order to stand out as candidate in a saturated field, I’m not sure how I’m going to pay for the further education the field requires and I am finding it hard not to have all of these things shouting away in my head all the time and when they shout, they start to drown out some of the quieter, good things in life. I am lucky to have found the person I want to marry, I am lucky to have gotten this work opportunity, I am lucky to even be able to consider further education as an option, I am lucky to have found a houseshare with both nice people and affordable rent. I know these things to be true but they can slip out of focus a bit when you are really tired and becoming trapped inside your anxiety.

But enough about the anxiety, back to the sewing therapy!

I decided to remake the Delphine skirt from Tilly Walnes’ book as my first attempt was such a disaster. I got some lovely cotton in a blue and white herringbone pattern. To add in an extra challenge I decided to draft my own pockets to go with the style. I love the giant pockets on the Miette skirt and have found them so useful for my job as there are areas at work where I am not allowed to take a bag but I still need my work keys, notebook, pencils, phone etc. It is so useful to just shove everything in my pockets! For this skirt I wanted large pockets, but internal and discrete looking one’s. I wanted this skirt to look smarter and more office friendly than the Miette does.

Pocket1

I don’t have very many good pictures, sadly, I have only my phone to work with at the moment and no one to take my pictures for me either so until I get better pictures, grainy, low light mobile pictures and a selfie in the grubby mirror in the Ladies will have to do!

Delphine

The pockets were simple enough and used the main shape of the front skirt pattern piece to create the shape. I made the pocket openings a little too narrow, in hindsight, but they are still big enough to get my hands, phone etc in there so they’ll do!

I’m happy overall, especially with the pockets, but sadly on it’s second outing one of the seams split and it is now awaiting repair.

The least therapeutic aspect of this project was the waistband. It came together easily enough but once again it was an awful fit. In a previous post I talked about the “Did I make a mistake, or is it my body?” question and I am starting to think that the answer is the latter. I am working on another skirt now, the Clemence, and I’m having the same issue with getting the waistband to fit. I think thick waistbands might not suit the twist and curve of my waist. I have a book on fitting, The Complete Photo Guide to Perfect Fitting, and I hope that this book will help me to understand how to correct what is going wrong but for now I don’t seem to be able to make a skirt that fits me well at the waist.

Those who have read my previous posts on beauty standards, particularly this one, will know that I am not body confident. Though sewing has been an excellent quietener of my busy mind, it has not yet fulfilled the dream of helping me to feel more confident in my own skin.

Megan

My next sewing adventure was with the Megan dress from Love at First Stitch. I am essentially just working my way through this book and I hope that by the end I will have the confidence to try out patterns from other designers.

I’ve been waiting a little bit to write this post. Firstly, because the finished Megan dress was worn to a wedding recently and I didn’t want anyone to know that I had made it myself as I was hoping someone would compliment my outfit and allow me my first ‘Thanks! I made it myself!’ moment. I am please to say that I was not disappointed. Secondly, because immediately after the wedding I started a new job in a new city and, frankly, I am exhausted!

The Megan dress from Tilly Walnes wonderful book, Love at First Stitch

The Megan dress from Tilly Walnes’ wonderful book, Love at First Stitch

I am, on the whole, happy with my make. I really enjoyed making this dress and as it came together I felt better and better about it. I was so pleased with how I had matched the darts on the skirt and bodice pieces and I really liked the fit. I am still not brave enough to start combining pattern sizes so I just went with one size and was worried that I might come to regret that decision but I haven’t. Perhaps I am still too used to ‘off the peg’ standardised clothes that never quite fit me right?! I like the fact that it looks quite fitted and structured but has a fair bit of ease still.

It isn’t a perfect fit, as the neckline gapes quite a bit, but for a novice I think it is a pretty good fit! I have ordered The Complete Photo Guide to Perfect Fitting and I’m hoping it will help me figure out how to identify and fix my fitting issues. We shall see!

Work in progress

Work in progress

I was absolutely in love with this dress and every time I tried it on to check the fit I was more and more thrilled. And then I added the sleeves…

Sleeve with gathering stitches

Sleeve with gathering stitches

I am glad I added them because I have learnt a new skill and will, I hope, be less daunted when I tackle any later projects that have sleeves, but I do not like these sleeves. I was very taken with the dress when it was still sleeveless but, for me, the slightly puffed up nature of these sleeves make me feel broad and bulky. I don’t think they suit me and they aren’t really my style. It was frustrating as I had worked so hard to make the sleeves only to discover that they didn’t look very appealing on me. I may remove them and try to convert the dress to a sleeveless one at a later date.

The finished dress!

The finished dress!

Apologies for the navy and polka dot bra that is clearly visible in the above picture. I couldn’t wait to try it on and didn’t think about my underwear! The below picture was taken at the wedding.

I will definitely make this dress again as I love the shape and if I add pockets (I love practical clothes and wish more came with pockets – adding pockets to anything possible is part of my sewing mission!) I think it could become a work staple. The Miette skirt really proved itself today at my new job – as the newbie it was really handy to be able to carry my notebook and a pencil in those giant front pockets! I think I will be making more of both in the near future but I want to try out all the other patterns in Love at First Stitch first – building up the skills!

I’m excited that I think I will have enough room in my new digs to bring my sewing machine and carry on the adventure.

Megan Wedding Guest

My Polyester Nightmare

Delphine Skirt - Tilly and the Buttons

This is the Delphine Skirt from Love at First Stitch. Isn’t it gorgeous? Wouldn’t you love a skirt like this? That is exactly what I thought so I set about making it.

Sadly, this was to be my first real sewing set back.

Making this skirt was a nightmare.

The instructions were clear, as always with Tilly Walnes’ patterns, but everything seemed to go wrong for me on this project. That is, everything except the thing I was the most worried about, which was the invisible zip (more on that later).

Let’s start with my first mistake: my fabric choice.

This was the first time I’d actually been to a fabric shop to pick a fabric. The fabric I originally bought for this project was part of an online order and everything that arrived was great except what I wanted to use for this skirt. It was described as being brown and on the picture on the website it was a brown and slightly burgundy spotted fabric. What arrived was black with gold/yellow spots. It still looked cool but the gold/yellow and black combo would go with nothing I owned. The shop were understanding and ok with me returning it but I wanted to get started on this project so I decided to brave a fabric shop.

I thought that being able to see and feel the fabric, rather than relying on descriptions, is probably a better way of choosing the right fabric for your project anyway. I now realise I have a lot to learn about what the hand feel of a fabric can me about how it will be to work with!

This fabric was difficult to cut, was fraying like mad, it was difficult to pin (the pin would catch and push out loops of thread or would simply not go through) and would not take a press at all. The iron on interfacing wouldn’t stick to it either. It was a polyester nightmare.

After this, I continued to make a lot of silly mistakes like sewing the incorrect sides together and there was a lot of seam ripping going on. I also think I must have made a mistake with my measurements when shortening the length of the pattern pieces as it ended up being a mini skirt!

The 'sort of' finished mini Delphine

The ‘sort of’ finished mini Delphine

I had tension issues with my machine and I’ve never had this problem before. It just seemed to get worse rather than better! The hem is an utter mess and should be ripped open and started again but as I’m never going to wear this skirt and it was so stressful making it I’m not going to bother. Because it wouldn’t press at all the hem and waistband are 3D tubes instead of lying flat. I just don’t have the experience yet to fix the many many problems with this skirt.

Tension issues - what a messy hem!

Tension issues – what a messy hem!

The one success story is the invisible zip. It is by no means perfect but it went in, I did it first time without having to undo or redo any of it, and when zipped up it is indeed invisible. Huge thanks have to go to my other half for this minor miracle because I couldn’t even figure out how to attach the invisible zipper foot to my sewing machine!

The invisible zip went in surprisingly easily!

The invisible zip went in surprisingly easily!

Look at that zip! Oh wait, you can’t see it! At least one good thing came out of this otherwise stressful experience.

Finishing the back seam with the invisible zip

Finishing the back seam with the invisible zip

Another reason this skirt is unwearable for me is the fit of the waistband.  I’m not sure if it is down to an error in my cutting out of the fabric or in my construction or whether it is a result of my scoliosis. I love the width of the waistband in the pictures in the book but I’m not sure that thickness of waistband works on me.

The waistband seems to fit me at the bottom but gapes awkwardly at the top.

I’m worried that that question (“Did I make a mistake, or is it my body?”) is going to be a recurring problem of my sewing odyssey.

Miette

After I finished my second pair of Margot jammies my order for the Miette skirt pattern by Tilly and the Buttons arrived along with the indigo cotton I wanted to use to make it. Needless to say, I was excited! The sewing odyssey continues!

My concern about the pattern was the tie front on the wraparound skirt. My body proportions mean my waist is not that much narrower than my torso (and not because they are both tiny, alas!) and I was worried that if the waist of the skirt adds bulk I’m not going to feel confident wearing the skirt. I found these pattern hacks on these blogs: Chainstitcher and Lladybird. These skirts are gorgeous! I thought that a few buttons would resolve my concerns so I decided to incorporate them. I’ve tackled buttons on envelope cushion covers before so I felt (fairly!) confident.

Previous projects with buttons - cushion cover and kindle case

Previous projects with buttons – cushion cover and kindle case*

I also had some left over fabric from the Margot trousers so I decided to have a go at giving the skirt a lining. The indigo cotton is a little thin so I was worried it might be see-through in the sunshine and I am a crazy person who likes to dive right in and make things harder for myself so hey, why not?!

On the whole, I am massively happy with the results! Hurrah!

Miette wrap-around skirt by Tilly and the Buttons

Miette wrap-around skirt by Tilly and the Buttons

The edges of the waistband, where I deviated from the pattern by not adding the waist ties, are not the neatest. I realised afterwards how I ought to have finished them for a neater finish. I should have taken the time to think about it and figure out the best solution but I was too excited to finish it so I just did any old thing to fix it in place. Lesson learned!

Miette wraparound skirt with button fastening and lining

Miette wraparound skirt with button fastening and lining

Another lesson was to make sure I really roll the seams to the inside if I’m going to line a pocket like this in a different fabric. I ended up with occasional white lines where the lining peaks out. I still love it though!

Miette pockets

Miette pockets

* Kindle case made from my own hand woven fabric from a weaving experience day, by the way.

Tilly

So, the sewing odyssey begins!

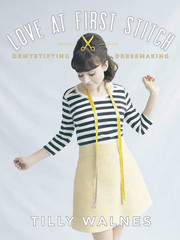
The Guardian article that inspired me to finally dust off (quite literally, I assure you) my languishing sewing machine led me to Tilly and the Buttons. A fantastic blog which has a wealth of guidance for the novice. I had no idea how I would take to sewing and Tilly took all the worry out of it. I spent hours each day reading all her tips for learning to sew and ordered the Miette pattern and some dark blue cotton and, ultimately, I bought her book, Love at First Stitch.

Love_At_First_Stitch_cover_medium

The book teaches you to sew by taking you through a series of increasingly complex (but all beginner!) makes. You can start with a simple Bardot style headband and work your way up to a lined dress.

I read the instructions for the headscarf but I didn’t want to make it. I want to learn but I don’t want to make anything I do not think I would actually wear and the scarf just isn’t my style. I was itching to get making so I started with the second project: the Margot pyjama trousers.

The book arrived really quickly (I ordered the Miette pattern and fabric first, but from a different shop and they took an age to arrive!) and I had no fabric. After a rummage through the flat I found an old table cloth that I didn’t like and got to work!

Tilly and the Buttons Margot PJ trousers, poorly photographed in the wee small hours.

Tilly and the Buttons Margot PJ trousers, poorly photographed in the wee small hours.

I made the Margot trousers in one sitting. That isn’t to say it was quick (I’m sure a more experienced hand could sew this up in a few hours but, alas, not I!) but just that I was determined and sewed into the night. Not my best laid plan as towards the end I did start to lose focus and make mistakes in my bleary eyed and excitable sprint to the finish.

Bed Time!

Bed Time!

The pattern was really easy to follow but I was disappointed to find I had made some mistakes and misunderstood a bit of the description so I decided that I wanted to get this pattern right before I moved on and made a second pair. This time I got to choose the fabric (one of the real delights of hand-making clothes!) and went for a lovely lightweight cotton in a plaid pattern.

Men's Margot

Men’s Margot

I loved working with this fabric, it has such a nice feel to it. I’m really happy with the finished article and I feel confident I can move on to my next pattern.

Onwards!

(Apologies for all the awful pictures! These were taken on my phone in poor light. In hindsight, I wish I’d taken better pictures and perhaps taken a few of the process too. Oh well! We live and learn!)

Starting Again

Well.

I cannot quite believe how long it has been since the last time I posted. I was so full of good intentions! It is time, I think, to start again. I’m facing a lot of changes in my life and I think it might be fun (read: useful for my sanity) to keep a record of what is going on and what I’m learning.

In two weeks I’ll be moving to Oxford to start a one year trainee placement working in an archive. Meanwhile planning a wedding with my other half, who is not moving to Oxford. Naturally, in this hectic time in my life I decided that now was the time to learn to sew!

I read this article in The Guardian and felt inspired. In the article, Jenny Rushmore talks about how learning to sew her own clothes changed how she felt about her body:

I grew up believing that no matter how successful, kind or loved I was, if I was overweight I wasn’t good enough. This feeling was most acute in my teens when, regardless of my nerdy achievements, constant diets and countless sit-ups, I knew I’d failed. […] It turns out, I’d been wrong all along. I didn’t have to dedicate my life to becoming smaller, but just had to learn how to make clothes that fit me as I am now. […] Your physical dimensions become simply a numerical input and not a value judgment. And trust me that you’ll never look better than when you’re wearing something you made, in a fabric you love, in a size that fits.

I found the article truly inspirational. I, like so many others, am two different dress sizes on the top and bottom, I’m too short for standard length clothes and just a little bit too tall (no one is more surprised about that than me!) for petite collections, and most of my clothes are a compromise – not quite the right size or fit, not quite the right colour or fabric. I’ll be the first to admit that I have too many clothes. I don’t really need any more! But at the heart of my massive clothing collection is the fact that I am still searching for the right clothes. Clothes that make me feel confident.

I’ve always wanted to learn to sew, so why not?

Voices

If I’m honest, I don’t know what direction this blog is going in. I don’t think it has one. I’m only a handful of posts in, so I may yet develop one, but right now this is more of an incoherent and infrequently updated online diary than a dedicated blog.

I am ok with this.

It is probably too incoherent to really attract a readership.

I am also ok with this.

“Why write a blog at all?” I hear the silent voices of my imaginary readership cry. I have no answer. I love notebooks. I love hand writing out diary entries and letters. I have countless, beautiful, empty books I have collected up just crying out to have all their pages filled and yet here I sit, typing away. Perhaps the reason is that I have always written my diaries with an imaginary reader in mind. I never expected any one to read my diaries but I wrote them as if I were speaking to someone. Not a specific someone, I had no one in mind when I wrote, but just someone. I wanted to get my feelings out, to express myself. In an abstract way, I wanted to be heard.

I was not heard, my only reader was myself, but the act itself was cathartic. I felt a relief from the outpouring. In many ways, keeping a blog could enable my fantasy of a reader, a kind listener on whose shoulders my burden is shared, to become more real. It is possible that someone will actually read this, after all.

All the multiple voices of the internet imply that my desire to be heard, even if only in an abstract or imagined way, is not an unusual desire. As our world gets bigger and other people seem to connect with people all over the world with ease and confidence, it can leave those of us with quieter voices feeling smaller and less and less able to be heard. So, rightly or wrongly, we shout louder.